Wednesday, 6 November 2013

Road Trip

This past weekend we took a trip to Adelaide for an engagement party. It was a long way to drive for 3 days (18hrs driving). But it was nice to catch up with some people, and family. Only 6.5 weeks till we do it again.

Here are some pictures I took at sunset. The train track ones are in Tintinara. The others between Coonalpyn and Tailem Bend.
~ Liz.


Tuesday, 5 November 2013

keeping it real....

I have my first stall coming up in 3 weekends. These are some of the new products I'm just finishing up, reading to sell there, and online. It is nice doing different things other than just paper.

.... keeping life interesting*.....

~Liz.

* the comment of one whom life is not thrilling often, and so printing onto fabric is like a rollercoaster.... Yep, thats me.

Thursday, 10 January 2013

Chai

So... Its been ages (and I truely do mean ages), since I last posted a blog. I took lots of photos over Christmas that I intend to share with you, but I imagine it will occur slowly, what with holidays still planned, and me either being outside enjoying the sunshine and weather, or hibernating from the heat! 

One of my favourite drinks (its my pretend adult drink, as I don't drink coffee at all, or tea much) is Chai. It is Chai spices infused in milk. Below is the recipe. This is what I cooked up for Jon and my mum the night after Christmas (Boxing day). 


Chai (latte I guess): 3 Cardamon pods, 4 All spice (whole) (pimento), 8 cloves, 2 cinnamon sticks broken in half, 1 star anise, and a finger (like a nobboly bit) of ginger. Add 1.5 teaspoons of sugar per mug full of milk. I then pour the milk (measuring mug fulls as per how many people want it) on top of it in a saucepan. I add a bit more spice if I am doing more than 3 mugs worth. Bring the milk to almost simmer (you want the milk to be hot, but not boil) stiring frequently. strain and serve.

~ Liz.

Wednesday, 19 December 2012

Recovering a chair

This past weekend, I finally got around to re-covering my old old chair. This chair belonged to my Great Gran. So it is really old. And dusty. And brown. (yes the fabric is supposed to be brown, but I don't like the colour brown, and so wasn't a big fan of the chair). So I unpicked the fabric. Noted how gross the foam was inside the chair. Sneezed a bit. Cut out a new pattern from the old. Bought new foam. Adjusted the covers on my sewing machine (when I found out I couldn't do a curved back). Stuffed them (actually Jon did). And now I sit on my chair. The firmer foam in the seat also means that you don't sink to the floor when you sit in it.

So pictures:


~ Liz.

PS. I haven't sewn the cushion cover yet. I just wrapped a pillow in the fabric I will use. The yellow of the cushion is very similar to the yellow in the stripe of the fabric.

Thursday, 13 December 2012

Christmas craft swap

This past weekend, I went to a party which was a Christmas Craft swap. We shared ideas, showed some things we'd made, and then sold/swapped things with each other for Christmas gifts. I got one for myself..... A TERRARIUM! (so excited)

I added a Big Ben figurine to it. I like it. It makes my desk fun!

~ Liz.


Thursday, 6 December 2012

Crazy Christmas

So much has happened in the last two or three weeks since I last posted a blog.

Jon and I celebrated our 2nd wedding anniversary.... by going to woodwork, and finally starting to get our tv unit glued together. We also went sailing for it the day after. It ended up we were on separate boats. But mine won, and that's all that really matters!

We also got robbed a little while ago, and all the replacement things came at once, so that was a lot of organising. But I got a new camera. Yes... perhaps this will mean good-bye to phone photos.

Check out this one I took yesterday! All I had to do was alter brightness and contrast, and i can blame that on the weather!


I have also had a lot of orders off etsy. Which is highly exciting. So I have been sending wrapping paper off around the world. (not as many orders as some people, but enough to keep me busy, but not over busy!)

So all in all, this month has been good. Although busy, and I sure am looking forward to summer holidays, Christmas, and beach. Hope yours has been as good as mine.

~ Liz.

Monday, 26 November 2012

Pull Apart Bed

On Jon and my way home from Church the other day, we saw this bed frame, and had to go back for it, and get it. Lets say we have grand plans. Deck chairs, Screen printing frames. Drawers for our tv unit. It will all get used eventually. I guess we just need to make time to make those things now!

~Liz


Sunday, 25 November 2012

attempting sales

It is after all coming up to Christmas, and seeing as I had designed and printed some nice Christmas cards, I thought I should let my street know I had done that too. So I made a quick display in my window. Haven't sold any yet. But who knows!
Don't forget you can buy them too!
~Liz

Thursday, 22 November 2012

They're growing!

A month or so ago I took a photo of our garden. I took another yesterday, and look at the difference!


We even have tomatoes set, and the zucchinis are flowering.
~ Liz

Tuesday, 20 November 2012

Bathers: Alison pattern part 2

PART TWO!

And so the sewing continued, long into the night. Not really. I never sew at night. It does my eyes in. It did indeed take a while to finish sewing my bathers, as it involved learning to thread an overlocker, borrowing overlocker, a holiday, and who knows what else. BUT they are done! YAYAYAYAYAYYA. And they even fit (sorry spoiler alert right there).

So the rest of the instruction are:

4. Sew gathering threads up the sides of the bust piece. ( as shown in picture below) I did seperate ones on the back half (facing), and front. And from the fold, to the curve. This seemed to work ok.

5. Tack bust piece into bathers, right sides together, with centre tab. (I shortened mine about 3cm). Overlock together. (I tried on my bathers before i overlocked, and established the width at the top of the body of my bathers was too wide, so i sewed in a bit closer. This is a good stage to try on, because changes can still be made.)

6. Overlock around the edges of the leg holes, and the main body, attaching the lining to the outside fabric.
7. Try on again, and attach the staps in the desired spots (use safty pins). My staps were barely long enough, but due to lack of fabric, I made do, and it just fits. And just is good enough when it comes to bathers. (The main body fabric ended up quite gathered, and the band looked normal, but when on, the main body fabric stretched to normal, and the band stretched, so that you get no gaps)
8. Fold over leg holes (like you are doing a hem) and zig zag around the edge. You can overlock elastic into your leg holes, but mine were tight enough, that hopefully they won't cause me any trouble.


9. Stretch band and sew (zig zag) with right side together around the top of the body. This means that the lining is now fully attached, and no longer can be seen from the outside of the bathers.


 10. Try them on again. and hope that they still fit.


I hope this doesn't look too daunting, I think it feels it, but it is fun, and in the end, only a couple of dollars of fabric wasted if it doesn't turn out! It doesn't hurt to try in the end! :D

~Liz

Monday, 19 November 2012

Bathers: Alison pattern

I know. I'm mad. My mum told me this when I mentioned I was planning on sewing my own bathers. But hey, I'm adventurous, and am know to pull things off, as well as ruin things completely sometimes.... So I guess we'll just see how I go.

I found the bathers I wanted. Of course I chose the pair with the least amount of instructions ever. There are some written instructions, but I'm a visual person through and through.

So I went for it. I read a lot of blogs on how to sew bathers. On what was wrong with the pattern I chose... and many more as well. I daftly cut out my pattern (which was an adventure in itself, as I'd never had to pay attention to pattern before, and this one had a symmetrical pattern on it, that would look best if centered!) So place and cut I did. I even managed to buy enough fabric. I was so pleased with myself. I then decided I didn't have enough to line it with the same fabric. I then inspected my other bathers, and the lining is actually quite different to lycra. Sort of a mesh type thing. So to Spotlight goes Liz. "Do you stock swimwear lining?" was my question. "No" was there answer. They kindly showed me the lycra section..... I went searching and found the dance wear lining section. It was what I wanted. (and I'd read earlier that day that swimwear fabric consists of 80-90% nylon, and 10-20% spandex). This was 90% nylon, and 10% spandex, so it suited me perfectly! YAY. (see big weave)


I was so happy I forgot to look at bra cups, and stretch needles. But I'll go back one day and get them. In the meantime it is deciphering patterns, and tacking things in place!

Oh, This is the pattern I decided to use: Alison, by Burdastyle. You can download it online. (only $3, but not really worth $3, when you have to do so much researching into how to actually sew it!) (apparently it used to be free)

So this is what I have done so far!

(Day 1 and 2)

Cut out pattern pieces.
Front: 1 fabric, 1 lining
Back: 1 fabric, 1 lining
Crotch: 1 fabric, 1 lining (yes this is the weirdest shape ever, and i'll let you know how it works, and what I'll change)
Center Fold Insert: 1 fabric
Strap (long): 2 fabric.
Back strap: none (I intend on doing cross over straps)
Un-named piece: 1 fabric (this piece is actually the tab that goes around the bust piece I think)


1. Pin side seams of front and back together, right sides together, of both fabric and lining separately. Tack.
2. Pin crotch piece to back, then front, with right sides together. You'll have to ease them onto each other, as  you'll be attaching a concave curve onto a convex one. Do this for the fabric, and the lining. Tack.
3. Overlock all tacked seams, so far. (overlocking will create a more secure seam, and leave less bulk than sewing with a regular zig-zag or similar, and then trimming)

Here are some photos of my fabric and what it looks like so far. (minus overlocking)


Wow... that was a lot of writing, for so little information! 

And tomorrow I'll give you the rest of what I did. And the finished product! :D

Thursday, 8 November 2012

What we cooked:

Potato Frittata:

We cooked a potato frittata for lunch on Saturday. It was yummy, although I think I would change a few ingredients next time.


Ingredients: Potato, garlic, rosemary, green capsicum, mushroom, eggs, milk, pepper, and feta cheese
Method: Fry the potato (sliced), garlic, and rosemary, until the potatoes start to brown. Add the mushroom, and the capsicum. Fry for a bit. Add the egg and milk and pepper mixture. Crumble the feta cheese on top. Put in hot oven (our thermostat doesn't work, so it was hot), and cook until it is cooked, and a bit golden on top. Remove from frying pan, slice it like a pizza and eat.

Note: Make sure you use a frying pan that can go into the oven.

~Liz

Tuesday, 6 November 2012

Packing cards

I have been busy recently packaging, and taking cards around to shops. This is what it looks like... Boxes and more boxes!
~Liz


Wednesday, 31 October 2012

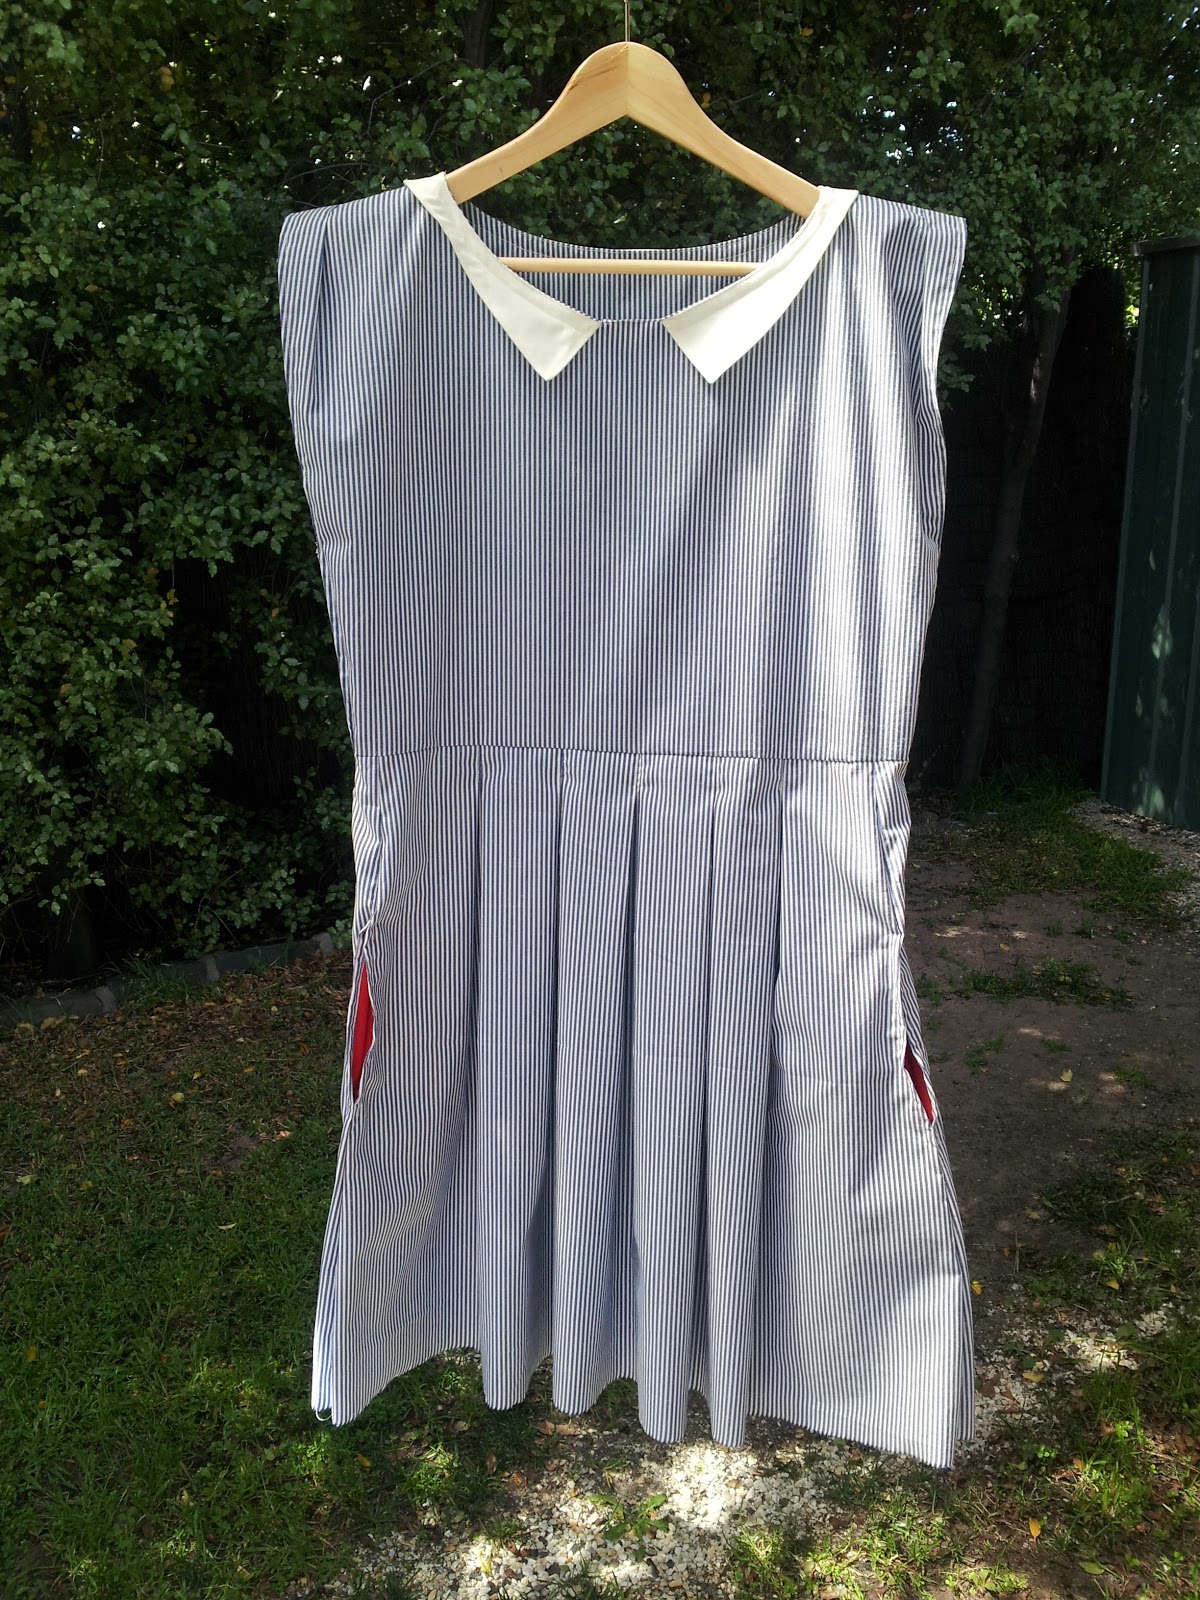
A dress

I decided the other day, that with the on-set of summer, I should sew a dress. I wanted something that was comfy, semi casual, and that didn't need a zip. I did succeed in all these things. And it even looks good on. I just need to hem it, and then I can wear it. (oh, and the weather actually needs to be warm enough too).


Did you notice the red insides to the pockets. Quite excited about pockets.

It looks quite squat, but with a belt it looks great. I guess I should get onto hemming it, and maybe pressing it too. That could help I guess!

~Liz.

Monday, 29 October 2012

What we cooked:

A smorgasbord!
And I totally didn't prepare any of it. I read the newspaper, while Jon cut up a heap of different things for lunch. I suggested things which we had run out of. (oops)


What we ate: Spicy Salsa with carrot, and celery, Bruschetta, Iced coffees with ice-cream! It was all super tasty! And on the extra plus side, I prepared none of it! Thanks Jon.

~Liz.

Sunday, 28 October 2012

Clocks

Jon and I were given this clock as a wedding present. I like clocks. I especially like reading clocks. As they are functional things, that tell you the time and such. This clock has frustrated me for almost a year now, due to its.... Silver, on Silver, on Silver, with a shiny face. It is a beautiful clock... It just didn't live up to my function of readability. So finally Jon allowed me to 'have a go at fixing it'. I say it came out quite well. Check out my before and after pictures.


I just un-screwed the glass front, painted, and re-attached the front again. Now I am happy! :D
~Liz

Wednesday, 24 October 2012

What we cooked:

Baked Eggs.

This is Jon's favourite breakfast. It does mean that by the time we get up on Saturday, and then cook it, it is usually Lunch time.... But who says I'm complaining!


Ingredients: Natural Yoghurt (or cream), chives, salami (or similar), parsley, chives, pepper, feta, and egg.
Method: Combine in layers the ingredients. Crack the eggs on top. Bake for 20ish minutes, or until the eggs are as you like them. Consume with toast.

~Liz


Monday, 22 October 2012

Summer staples

Well, actually maybe the staples of life!

I finally got around to using some of my stash of fabric, turning it into some t-shirts. Seeing as I don't own an overlocker, it was a little more creative sewing than your average t-shirt. But they turned out super. I can tell, because so often when I go looking to wear them I find that they are in the washing pile. So either I wear them often, or I don't do my washing often enough!? (Is both an answer?)

I traced around an old tshirt that I like, and know how it fits, and adjusted it as I cut. This tshirt has no sleeves, so bargain easy! :D
I cut it on the fold, with the t-shirt also folded in half, cutting out the front, and then the back, as the front and back pieces are not the same.

I sewed the shoulders together, then the sides. (I sewed it using a stretch straight stitch). Adjusted any hems and sleeves that didn't match in length with a pair of scissors, and hemmed with a zig-zag stitch. I also folded 5mm over and zig-zagged around the sleeves, and neck. The joy of sewing with stetch fabric is that is won't fray! YAY.

 And this is what they turned out like:


I definately plan on making more. Who says you can't fill your wardrobe with one cut of tshirt!
~Liz

Tuesday, 16 October 2012

Making buisness cards

I thought I'd post my method of making business cards. It is very easy. It is also the method I put my details on the back of cards I screen print.


I designed a stamp in photoshop, just black imaging on a white background, then I took it to Office works, and had them make just the rubber section of the stamp. I stuck it onto a piece of timber, (which took me 45min to cut with a hand saw, because I chose red gum to cut!) I stuck the stamp on, and proceeded to stamp everything, everywhere! Or maybe just lots of them.

Things I might do differently... Make sure the timber has a truely very flat surface, because the slightest dent means that the stamp on that section won't print. Also maybe have slightly bolder letters for some words. The thinner words are more easily stuffed up with too much ink/movement etc.

That is all.
~Liz.

Friday, 12 October 2012

An attempt


I recently attempted making my own screen using drawing fluid and screen filler. Let just say.... I learnt a lot!

I painted on the drawing fluid, quite thick, (perhaps a little too thick, as then it ran when i put the screen filler over the top).


I then poured, and squeegied the screen filler over the drawing fluid. You can only do one (1) swipe of the screen filler, as the drawing fluid starts to dissolve into the screen filler, and makes your images not so crisp and clear. I have not yet perfected the method of using either the screen filler or drawing fluid. I will need to practice some more. But I will let you know my results as I go. (note the small hole just next to the flame of the candle)


And then this happened. No it will most likely not happen to you, unless you also put your scissors through your screen, but decided to proceed with adding drawing fluid, and then screen filler over the top, because really it can't get any worse right.... wrong. My screen spilt in two. What was a small hole, over night (I pressume as the filler dried, and tightened the screen) became a massive tear. So I rinsed out the drawing fluid, just to see what it had done, and left my screen to die in a corner of my house for the next month or so. It looked ok... (not tested with printing) except for the massive tear. I would have liked my images to be a little more crisp around the edges. So next time I trial this, I will attempt to not put too much, nor too little blue drawing fluid on. (too much runs, too little is just covered up with the red screen filler).


And so the moral of this story is... Don't stick scissors through screens.... it doesn't end well.

~Liz.